Features
An Introduction To The Art of EQ
The humble EQ is easily overlooked by novice producers but it is arguably the most important part of the mix process. Below, we clarify some of the basic concepts behind EQing and explain how you can achieve professional results using your home set-up.
Basic Concepts
The fundamental concept that needs to be grasped is that each individual musical element needs to occupy its own space in the mix. Each instrument will naturally occupy a certain band of frequencies and these frequencies can be tweaked with EQ so that they don’t overlap too much with the frequencies produced by other instruments. It is easiest to explain this idea clearly with examples. A classic problem area in mixes is around the kick drum. Take a look at the image below:
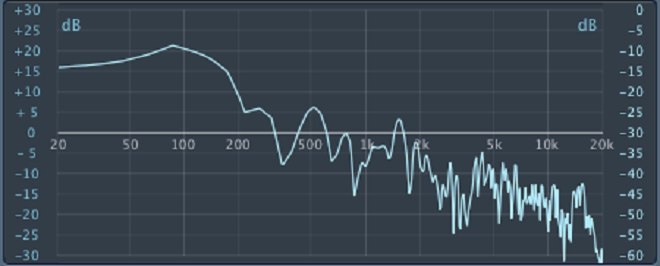
This is a frequency analysis of a standard, if pretty ‘big’ sounding kick that could be used across multiple genres of electronic music. Compare it to the image below – a synth bass playing a C2 note:

Now, if we’ve established that each instrument needs to sit in its own space, then it is obvious where problems could arise if the two elements above were to feature in the same mix. They are both very prominent sub-250Hz, each sound peaking at around 90Hz. In other words they naturally sit in pretty much the exact same place in the frequency spectrum. The result of having too many elements with prominent frequencies in the same area is muddiness or boominess if those frequencies are low, and harshness if those frequencies are high. This is where EQs come in – we can sculpt the above elements until they slot together nicely in our mix. So how do we do that? Take a look at the images below for an example.

Sample kick drum EQ

Sample bass EQ
In the examples above you can see that the kick has been allowed to remain prominent at around 100Hz, where kick drums often sound nice and punchy, but it has been backed off between 200-500Hz and cut completely below about 50Hz – these areas are where the bass will sit. The bass has been cut quite dramatically at 100Hz so that it doesn’t interfere too much with the kick. It has also been boosted between 200-500Hz (the same area the kick has been cut) so that it can give us some nice, warm low mids. You will need to make compromises such as this throughout your mix, until every single element is in balance.
It is worth thinking about exactly what job each musical element is doing in your mix – this way you can identify whether certain frequencies are completely unnecessary for certain instruments. For example, maybe you have a synth playing a high pedal note in your track. This synth is being used to add some high frequency interest and ‘shimmer’ to your mix; you are therefore mainly utilising its frequencies from maybe 8kHz and up. This synth probably contains many lower frequencies that we can’t really hear in the final mix, but that are nevertheless cluttering things up – making other musical parts less distinct. It is therefore well worth considering putting the instrument through a high pass filter – cutting off all lower frequencies below a certain point. If we cut at too high a frequency, we may end up with a brittle sounding instrument, but if we cut everything below 1 or 2kHz we will probably be OK, and will be freeing up space in our mix. Many synth parts can probably be cut below 60Hz with no real adverse effects, and this will clear up much more room for your bass and kick.
Troublesome Frequencies
So far we’ve discussed the overall picture of what EQs are used for in a mix, but what about the specifics? Say you have an unpleasant ringing in an otherwise great drum sample; how do you deal with that? The quickest way is to set a very narrow Q (the width of your EQ filter) and boost the gain as high as it will go. You can then sweep this filter back and forth across the frequency spectrum. When you encounter the troublesome ringing it will hopefully be very apparent exactly which frequencies it sits at – these will stick out like a sore thumb. Once you have isolated the problem frequency, simply turn your gain boost into a cut, and you will remove the problem from your mix.
Your Workspace
The fact of the matter is; most producers of electronic music don’t work in acoustically treated rooms. This is a real problem when it comes to EQing. Most small home-studio setups suffer in particular from low-end resonance problems due to factors such as the shape of the room, monitor positioning and reflective surfaces. The low end is obviously vital in all forms of dance music, so what can we do to get this right? If there is no way you can acoustically treat your room, there are a couple of work-arounds, that are not ideal, but will certainly help.
Headphones
In a professional studio, you would generally do the vast majority of your work while referencing on monitors, but at home, due to the reasons described above, the most accurate monitoring system available to you is often headphones. For this reason, it is well worth investing in a good pair that will give you as accurate a picture as possible – bass-boosting models such as Beats really aren’t your friend here. Some examples of good, accurate headphones are Beyerdynamic DT-880s or AKG K702s. A decent pair of headphones will certainly help you to balance your mix, but due to a lack of power in their drivers, they are still not able to give you a totally accurate picture of the low frequencies you are working with. Use headphones, but use them in conjunction with the following techniques.
Frequency Analysis
Given all the difficulties of obtaining an accurate representation of what is actually going on in your mix, it is well worth considering some other monitoring tools that aren’t affected by the room you are in or the quality of your hardware. Frequency analysis can be extremely useful in pinpointing problem areas of your mix. Logic’s EQs come with a frequency analysis capability (used in the screen shots above), and it is possible to pick up perfectly decent frequency analysis plug-ins for free, whatever your platform. It is well worth integrating this into your workflow.
Averaging The Room
One of the key problems with room resonance is that it changes as you move around the room. Try it – you will see that the amount of bass coming from your monitors seems to change as you alter your position. We can actually use this as a tool to get our bass right. Get to know your room and listen to your mix from various positions within it. Try to work out what the average amount of bass is in your mix as you move round the room – and try to balance your mix using this information. It takes some practice, but room averaging can be very useful.
If you are able to use the above tips to guide your EQing, you will, with practice, be able to achieve very professional results using your home set-up.